Creating a PageCarton theme isn't actually a difficult task, but just that it might involve a long process and a little bit of how programming codes work. The main purpose of having a PageCarton theme is to ensure other users get an easy and fast customization of their own personal websites with the use of the themes(which serve as a template) created by other users.
Getting an HTML Template File
Download your desired already-designed template file. These kind of templates are most times in a .zip file or other file extensions. In the template will consist of different html and css files; the template can be a personal template or website designed by you. You may get a clean and well-arranged HTML-based template from free-css.com or other sites related to it. There are some other sites you can easily get your already-designed websites, check where to get html templates.
https://youtu.be/CcbvPtcCNuQ
Uploading Template File into PageCarton Admin Panel
After the complete download of your clean already-designed template file(.zip file), the next step is to import it into your PageCarton Admin panel so your PageCarton theme creation and development start from there. If you don't have pagecarton installed on your pc, you can download the latest version of pagecarton on Latest PageCarton Update, and go to How To Install PageCarton for the simplified instructions on how to install pagecarton on your offline server.
So go to the pagecarton admin panel of your local server to start with your theme creation.
- Navigate to 'Appearance' from the next screen shown.
- Proceed to 'Themes'.
- Click on 'Upload New Theme'.
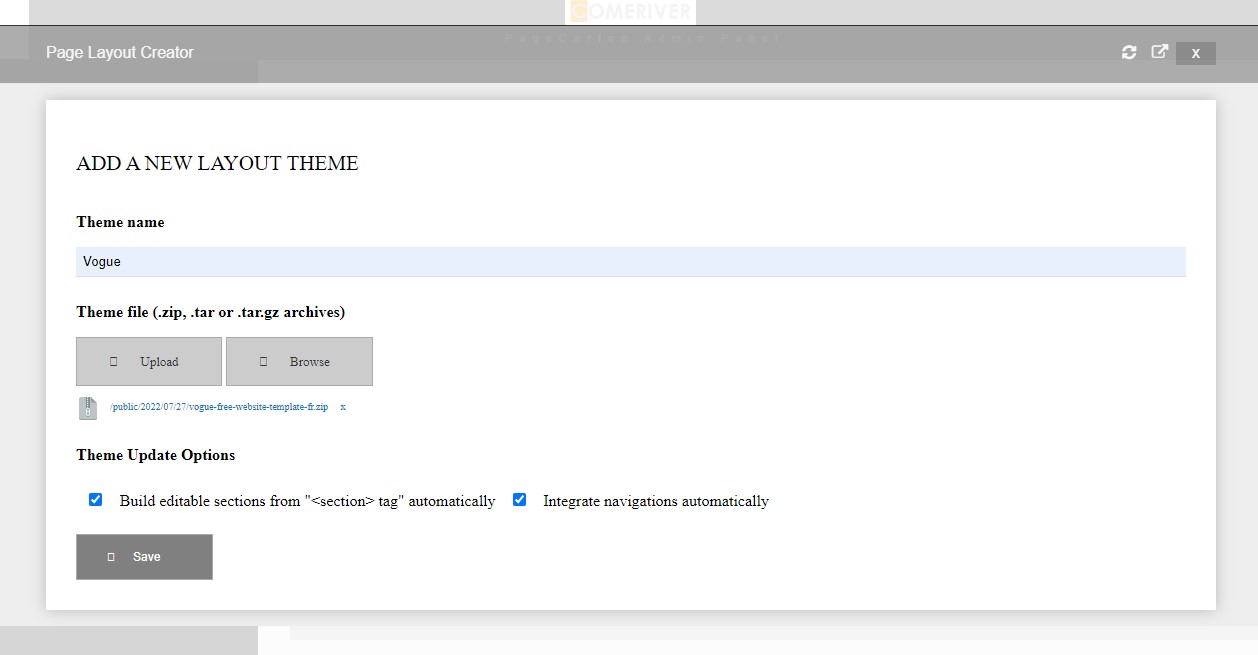
- Input your desired name of theme in the required space. (Preferably the same name of the template downloaded from the other source)
- Upload your theme file
- Leave the theme update options as they are, to avoid future problems or bugs
- Click on 'Save'.
- Close pop-up screen shown
- Then your new theme should be listed on the 'My Themes' section
- Click on 'Options' on the row of your new theme
- Click on 'Preview' from the dropdown options, to check if the theme is working perfectly fine as to the template that was downloaded.

The picture above shows how your page should look when you are about to preview your theme.
https://youtu.be/frd8zxVLPSA
Importing the Theme into your Code Editor
After the confirmation and everything is working fine, then you can go on the next step to editing your theme and making it easy for others to use your themes. There are different ways to edit your theme, and they are listed below, the best and suitable way will be showed after the whole explanation of how to edit your theme to make it reusable for other users.
The suitable method is to use any code editor of your choice, either a text editor or an IDE, like VS Code, Sublime Text, Atom and the likes. Using this method, it will be ideal to use an offline server like localhost, so the steps to open it on a code editor(VS Code to be precise) will be outlined below:
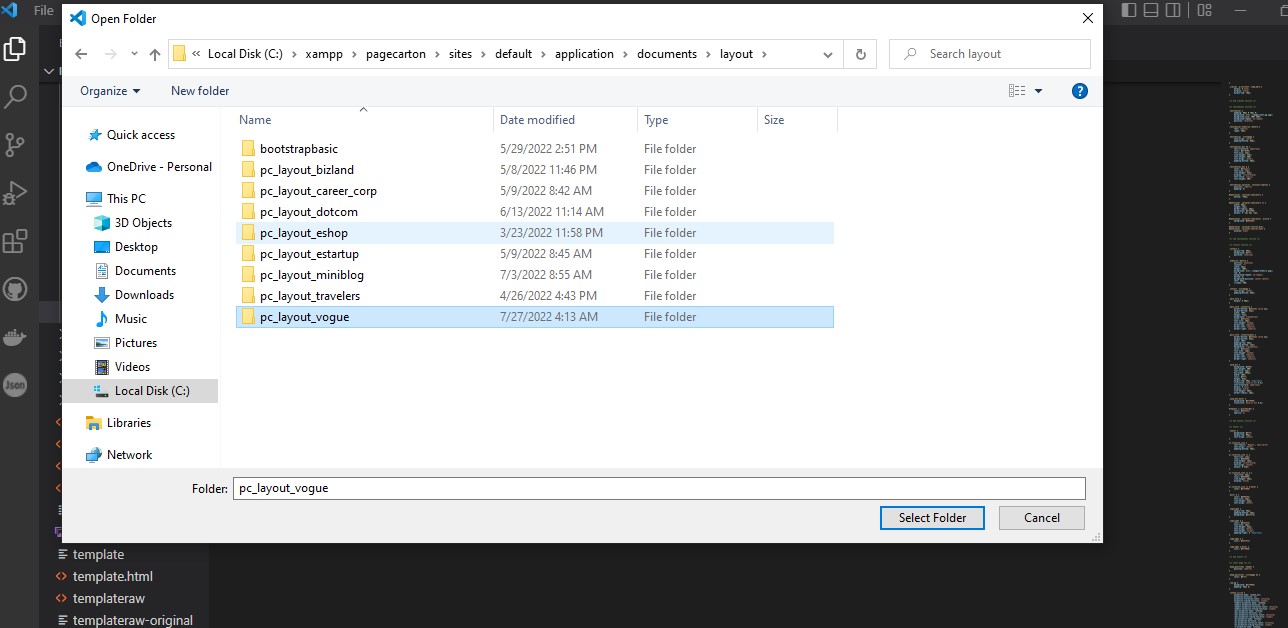
- Open your VS Code App
- Navigate to File, Click on 'Open Folder' or press Ctrl + K + O
- Go to your Local Disk
- Locate your local(offline) server folder (e.g. xampp)
- Go to pagecarton, then to sites, to default, to application, to document, to layout
- Then left-click the folder with the name of your uploaded theme
- Click on the 'Select Folder' box at the bottom right corner of the page.
After carefully following the above steps, the folder should be loaded on your code editor. The directory should be like the one below...
https://youtu.be/iMPiEFrRBKs
Editing the Header and Footer
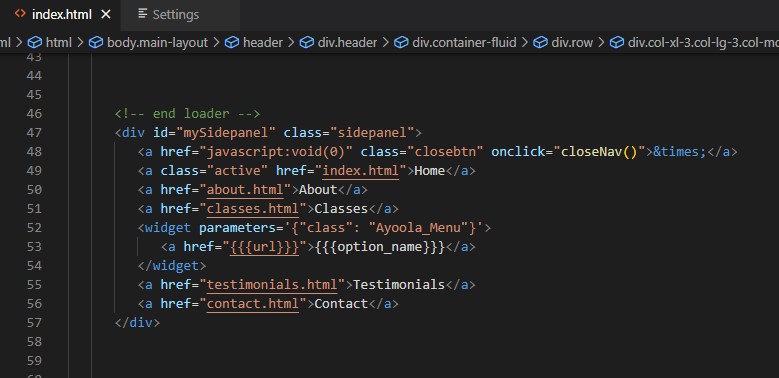
Now that the theme folder has been imported to your code editor, we can start editing and integrating different pagecarton functions into the necessary html codes. So to start with, the navigation bar menu, header and footer are meant to be edited first and it's very important to note that the 'header' and 'footer' section are meant to be edited in the 'templateraw' file on your code editor, and other codes can be edited on 'index.html' and other menus. The 'templateraw' file can be found in the Left-Side Bar of your VS Code, or you can use the shortcut Ctrl+Shift+E to open the Explorer Bar.
For the navigation bar, you will need to add a widget for url link so if other users want to add another menu on their website while using your theme, the widget will help with that. To do that, the code below will be used in the appropriate section where the other nav menus are placed:
<widget parameters='{"class": "Ayoola_Menu"}'>
      <a href="{{{url}}}">{{{option_name}}}</a>
</widget>
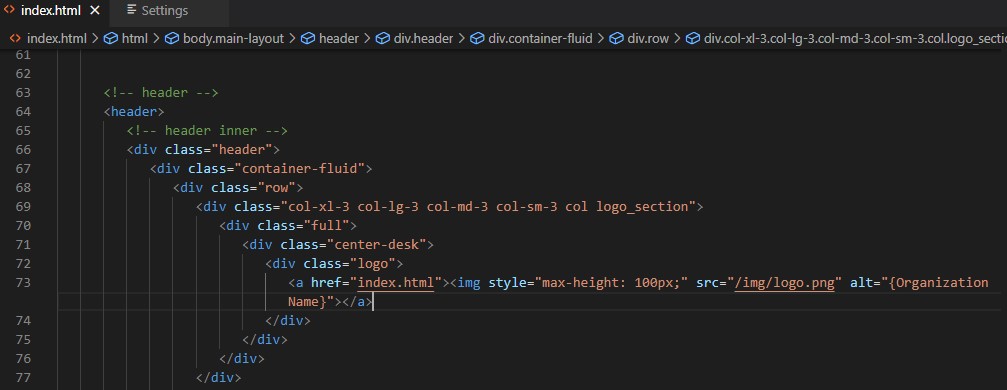
The next is to update the logo in the header and footer of the template, so the logo uploaded in your website wizard can reflect instead of the default logo in your template. The code below should be replaced with the one in the logo tag in the code:
<img style="max-height: 100px;" src="/img/logo.png" alt="{Organization Name}">
https://youtu.be/S0MZVJdSlsU
Using Standard Replaceable Texts
Some dummy contents should be noted in your template, dummy texts like lorem ipsum dolor and the likes, so that's where standard replaceable texts come in. It is highly recommended to use standard replaceable texts so users changing themes won't need to update new contents. Check how to use standard replaceable texts here to have more understanding of how and where to use standard replaceable texts in your theme.
https://youtu.be/qxxgz6jxzD0
Integrating Template Forms to PageCarton Forms
Next is to integrate your html template form(s) to work as pagecarton forms by embedding the in-built widgets using this guide: Linking HTML forms to PageCarton Forms. There are different kind of forms which can be on a website. Examples are Sign Up Form, Email Opt-in Form, Contact Form, etc. But you are to check your template well and know the kind of form that is on the website, and by then you can choose the 'form widget', 'widget url' and 'method' to use.
For example, if the form on your template is a contact form, the 'form action' attribute should be set to '/widgets/PageCarton_Conatct_Form' and the 'method' attribute set to 'POST' (all without the quotes).
https://youtu.be/9WPrRygChQ4
Editing Main Content using Post Types Parameters and Widgets
Most times, there are categories like posts in the different sections of websites, so to integrate that into something relatable to the pagecarton admin panel, we embed them so they can be automated using 'Application_Article_ShowAll' or other types of widgets available on pagecarton. Check how to use standard post types parameters in embedding widgets to see different Post Types parameters in embedding widgets. Ensure you use only standad post types so users won't need to update contents again when they change themes. Other parameters to note are:
- 'add_a_new_post' - the number of posts to be displayed
- length_of_title - the maximum number of characters to display in an article_title
- length_of_description - the maximum number of characters to display in an article_description
A pictorial example is shown below.

Other widgets that can be added are:
- Application_SiteInfo - to access the site headline, description and the banner image from the database
- Ayoola_Menu - to display navigation options
https://youtu.be/HMpwuXe5e0k
Editing Dominant Colors and other Sections
So the next step to do is to change the dominant color(s) in your template into the pagecarton background color or font color, so check out for the main theme colors(i.e. the colors that are frequently used in the 'style.css' file in your code editor). The easy way to change the color is to use the 'Application_SearchReplace' widget and this widget code should be used at the beginning of the stylesheet. The dominant color will then be replaced with the background color set in the pagecarton admin panel. The code to use is shown below: (using '#ff0000' and '#e90102' as your frequently used colors in this context)
/*
<widget parameters='{"class": "Application_Global"}'>

<widget-inner parameters='{ "class": "Application_SearchReplace", "search": ["#ff0000", "#e90102"], "replace": "{{{pc_background_color}}}"}'>
#ff0000 - {{{pc_background_color}}}
 */

And there should be a closing tag at the end of the 'style.css' stylesheet too, as shown below:

/*
     </widget-inner>
     </widget>
*/
https://youtu.be/NK1pLiD6SmA
So, upon the completion of the steps above, your pagecarton theme should be set and ready for upload.